What this section is for #
The Tenant section allows the Provider to create, configure, and monitor tenants linked to their account.
A tenant can represent:
- a customer;
- a department;
- a division;
- a location;
- a business unit;
- an operational group;
- an internal area within the same Provider organization.
From this section, the Provider can:
- create new tenants;
- view the list of existing tenants;
- check tenant status;
- assign monthly minutes;
- assign available users;
- assign activatable runtimes;
- configure overage;
- manage report privacy;
- define allowed channels: Web, VR, or Web + VR;
- enable or disable Business Experimental;
- configure the tenant’s White Label, if applicable.
Resources still assignable #
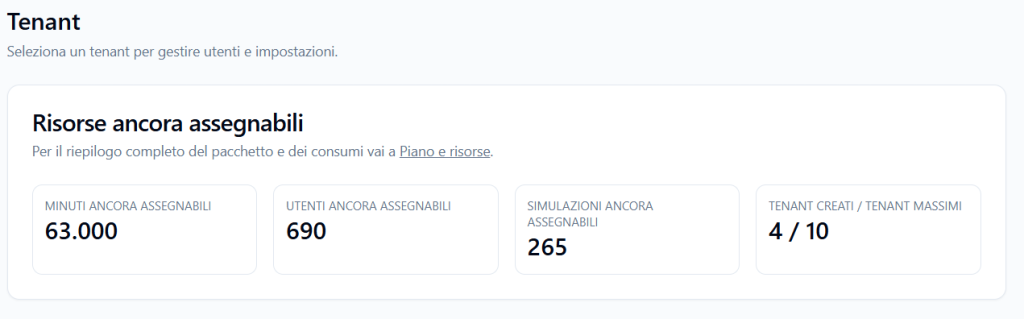
The Resources still assignable section shows how many resources the Provider can still distribute to tenants.
These values depend on the Provider’s membership plan and the resources already assigned to existing tenants.
The screen may display:
- Minutes still assignable
- Users still assignable
- Simulations still assignable
- Tenants created / maximum tenants
Example:
- Minutes still assignable: 63,000
- Users still assignable: 690
- Simulations still assignable: 265
- Tenants created / maximum tenants: 4 / 10
This means the Provider still has resources available to distribute to tenants, but cannot exceed the limits set by their plan.
Tenant list #
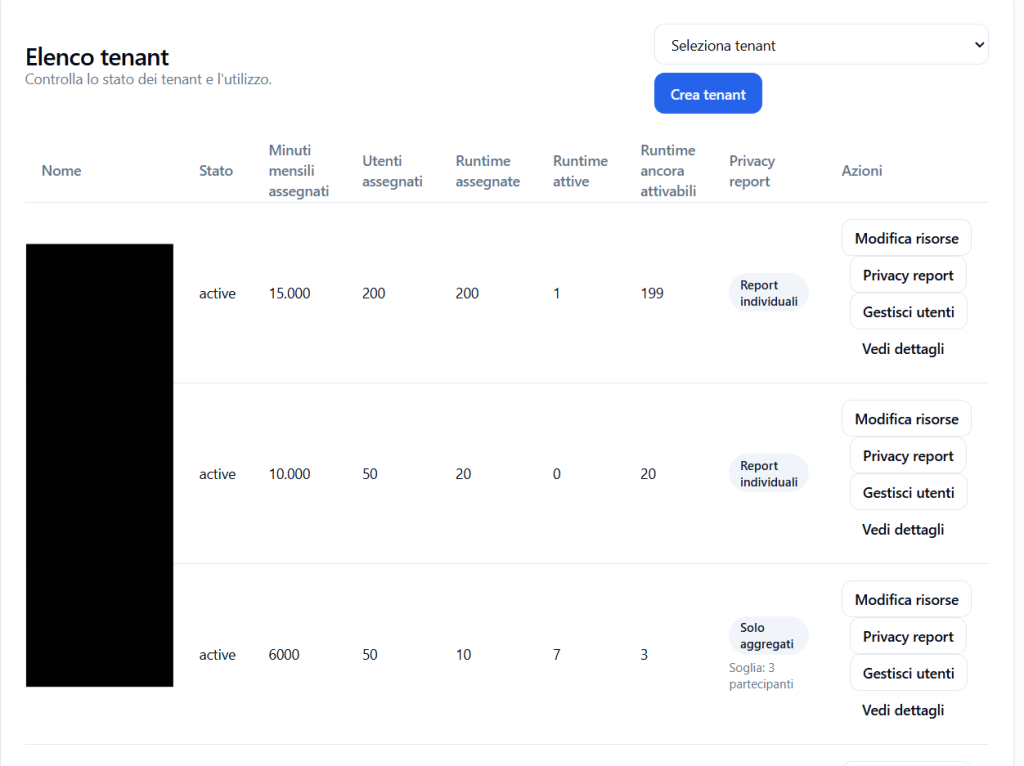
The Tenant list section displays all tenants created within the Provider.
The table allows quick monitoring of status and resource usage for each tenant.
The main columns are:
Name #
Shows the tenant’s name.
The name can represent an external customer, an internal department, a location, a business unit, or a division.
Status #
Indicates the tenant’s status.
Example:
active
An active status indicates that the tenant is active and can be used according to the configured resources and permissions.
Assigned monthly minutes #
Indicates how many monthly minutes have been assigned to the tenant.
These minutes are consumed when Players run simulations or when internal tests using runtime resources are performed.
Assigned users #
Indicates how many users can be created in the tenant.
Users can include, depending on available permissions:
- Tenant Admin;
- Manager;
- Player.
Assigned runtimes #
Indicates how many runtimes can be activated for that tenant.
A runtime is an operational access to a simulation, configured with language, channel, avatar, voice, authorized Players, dates, and attempts.
Active runtimes #
Indicates how many runtimes are currently active in the tenant.
Runtimes still available #
Indicates how many runtimes the tenant can still activate before reaching the assigned limit.
Example:
If a tenant has:
- Assigned runtimes: 10
- Active runtimes: 7
- Runtimes still activatable: 3
it means it can still activate 3 runtimes.
Report privacy #
Shows the privacy policy configured for participant reports.
Examples:
- Individual reports
- Aggregated only
- Threshold: 3 participants
This setting defines whether the Tenant Admin can view individual Player reports or only aggregated data.
Actions #
Available actions may include:
- Edit resources
- Report privacy
- Manage Users
- View details
Creating a new tenant #

To create a new tenant, click Create tenant.
A window dedicated to tenant creation opens.
Tenant name #
Enter the tenant’s name.
Examples:
- Demo Company
- Oncology Department
- Sales Italy
- Compliance EMEA
- Faculty of Medicine
The name must be clear and recognizable.
Provider #
The Provider field shows the current Provider.
The new tenant will be created within the selected Provider.
Tenant slug #
The slug is the tenant’s technical identifier.
It is recommended to use a slug that is:
- short;
- lowercase;
- without spaces;
- with hyphens between words.
Example:
demo-company
Status #
The status field indicates the tenant’s initial condition.
Example:
active
An active tenant is available for use after creation and resource configuration.
Initial allocation #
During tenant creation, the Provider can immediately assign the first resources.
The Initial allocation section also shows the Provider’s remaining resources.
Example:
Provider remaining: 63,000 minutes, 690 users, 265 runtime sims.
This helps understand how much capacity is still available before assigning new resources.
Assigned monthly minutes #
Indicates how many monthly minutes are assigned to the tenant.
The tenant will consume these minutes during simulation usage.
Assigned users #
Indicates how many users the tenant can create.
Assigned runtimes #
Indicates how many runtimes the tenant can activate.
Allow overage #
The Allow overage option allows the tenant to exceed the assigned monthly minutes up to a configured maximum limit.
This option is useful when you want to avoid immediately blocking the tenant upon reaching the base quota, while still maintaining a control limit.
Maximum monthly limit with overage #
If overage is active, a maximum monthly limit can be set.
Example:
- Assigned minutes: 6000
- Maximum monthly limit with overage: 7000
In this case, the tenant has 6000 included minutes but can reach up to 7000 minutes in the month.
Participant report privacy #
During tenant creation or modification, the Provider can configure report privacy.
The main options are:
Individual reports visible to Tenant Admin #
With this option, the Tenant Admin can view complete reports of individual participants.
This is useful when company policy allows individual report visibility.
Aggregated data only #
With this option, the Tenant Admin can view aggregated statistics and simulation trends, but not individual participant reports.
This mode is recommended for contexts with privacy constraints, union agreements, or internal policies.
Minimum threshold for aggregates #
The numeric field defines the minimum threshold of sessions or participants required to display aggregated data.
Example:
3
This means aggregates are shown only when the number of sessions or participants reaches at least that threshold.
The threshold serves to reduce the risk of re-identifying individual Players.
Modifying a tenant’s report privacy #
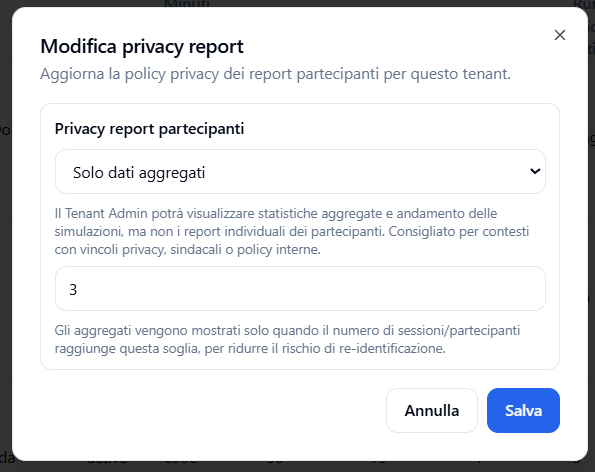
To modify a tenant’s report privacy:
- locate the tenant in the list;
- click Report privacy;
- select the desired policy;
- set the minimum threshold;
- click Save.
The modification updates report visibility for that tenant.
Modifying a tenant’s resources #
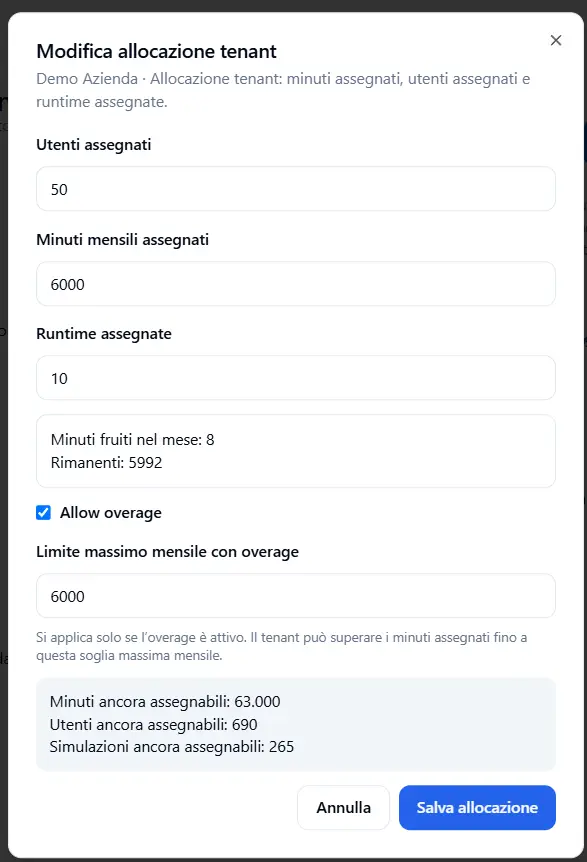
To modify a tenant’s resources:
- locate the tenant in the list;
- click Edit resources;
- update users, monthly minutes, and assigned runtimes;
- configure any overage;
- click Save allocation.
Assigned users #
Allows modifying the maximum number of users available for the tenant.
Assigned monthly minutes #
Allows modifying the tenant’s monthly minute quota.
Assigned runtimes #
Allows modifying the maximum number of runtimes activatable by the tenant.
Minutes used in the month #
The window may show how many minutes have already been consumed in the month and how many remain.
Example:
- Minutes used in the month: 8
- Remaining: 5992
This data helps modify resources consciously.
Minutes, users, and simulations still assignable #
In the modification window, a summary of resources still available at the Provider level may be shown.
Example:
- Minutes still assignable: 63,000
- Users still assignable: 690
- Simulations still assignable: 265
The Provider cannot assign more resources than those available in their plan.
Manage tenant users #
In the Tenant list table, among the actions available for each tenant, there is also the button:
Manage users
This function allows the Provider to access user management for the selected tenant.
Its primary use is to create the tenant’s first Tenant Admin.
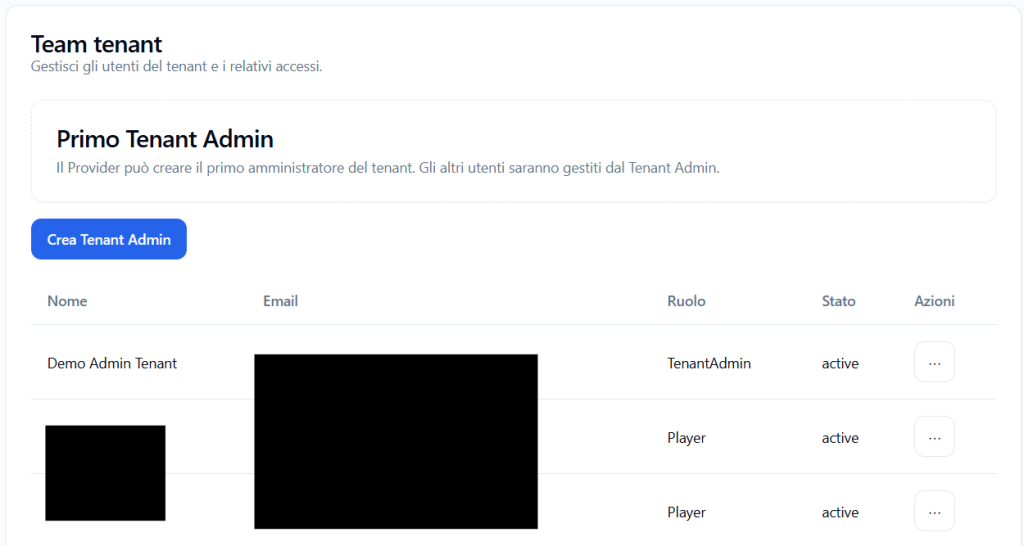
First Tenant Admin #
When a Provider creates a new tenant, they must also be able to create at least the tenant’s first administrator.
The first Tenant Admin is the user who receives administrative access to the tenant and can then independently manage users in their environment.
In the Tenant team section, a box is displayed such as:
First Tenant Admin
The Provider can create the tenant’s first administrator. Other users will be managed by the Tenant Admin.
This means the Provider must handle the tenant’s initial setup by creating the administrator user who will take over operational management.
Create Tenant Admin #
The Create Tenant Admin button allows the Provider to create the first user with the TenantAdmin role for the selected tenant.
This user will be responsible for administering the tenant and, once logged in, can create and manage other users.
The Tenant Admin can then manage, according to available permissions:
- Players;
- any other tenant users;
- simulation access;
- password resets;
- user imports;
- tenant team management.
What the Provider can see in user management #
When the Provider enters Manage users, they can view users already present in the tenant.
The table shows information such as:
- name;
- email;
- role;
- status;
- available actions.
Roles can include:
- TenantAdmin
- Player
Status can indicate whether the user is active.
Example:
active
Provider’s role in user management #
The Provider has a supervisory and initial configuration role.
Specifically, they can:
- create the first Tenant Admin;
- verify which users are present in the tenant;
- intervene in case of administrative necessity;
- check that the tenant has an active administrator.
However, daily user management should be performed by the Tenant Admin.
Tenant Admin’s role in user management #
After the Provider has created the first Tenant Admin, it will be the Tenant Admin’s responsibility to manage users in their tenant.
The Tenant Admin can:
- create new Players;
- import users via CSV;
- modify users;
- change or reset passwords;
- delete users no longer needed;
- manage team operational access.
This way, the Provider does not need to handle the routine management of each tenant.
Why this separation is important #
The separation between Provider and Tenant Admin allows clear role definition.
The Provider creates and configures the tenant, assigns resources, and creates the first administrator.
The Tenant Admin then manages operational work within the tenant.
This model is useful because:
- it prevents the Provider from having to manually manage all users of every tenant;
- it gives autonomy to Tenant Admins;
- it keeps responsibility levels separate;
- it makes managing many tenants more scalable;
- it allows the Provider to intervene only when necessary.
Recommended workflow #
The correct workflow is:
- the Provider creates the tenant;
- the Provider assigns resources, report privacy, channels, and initial configurations;
- the Provider enters Manage users;
- the Provider creates the first Tenant Admin;
- the Tenant Admin logs into their tenant;
- the Tenant Admin creates and manages their users;
- the Provider maintains a control and supervisory function.
The Manage users option allows the Provider to complete the tenant’s initial activation by creating the first Tenant Admin.
After this phase, routine user management passes to the Tenant Admin, who can create Players and administer their tenant’s team.
The Provider still retains the ability to view and supervise users created within linked tenants.
Tenant details #
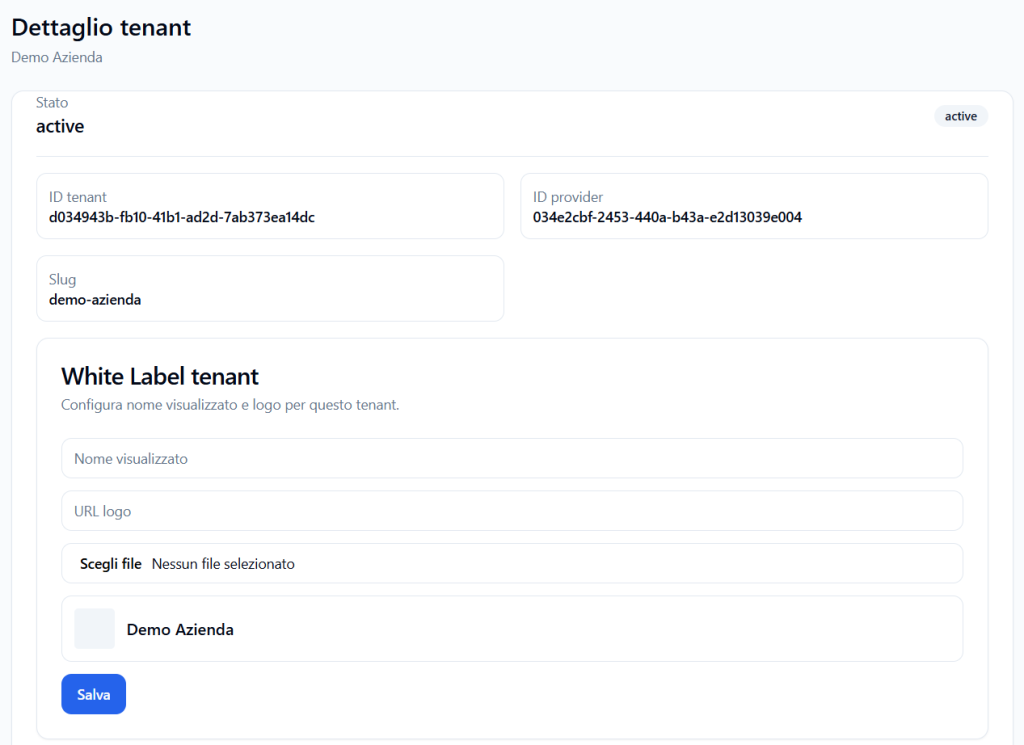
By clicking View details, the Provider accesses the tenant’s detail page.
This page may show:
- tenant status;
- Tenant ID;
- Provider ID;
- slug;
- tenant White Label configuration;
- participant report privacy;
- Business Experimental;
- allowed channels.
Tenant White Label #
The Tenant White Label section allows configuration of the tenant’s displayed name and logo.
It can include:
- displayed name;
- logo URL;
- logo file upload;
- brand preview;
- Save button.
This configuration allows customization of the tenant’s visual identity, if the Provider’s White Label policy permits.
Business Experimental #
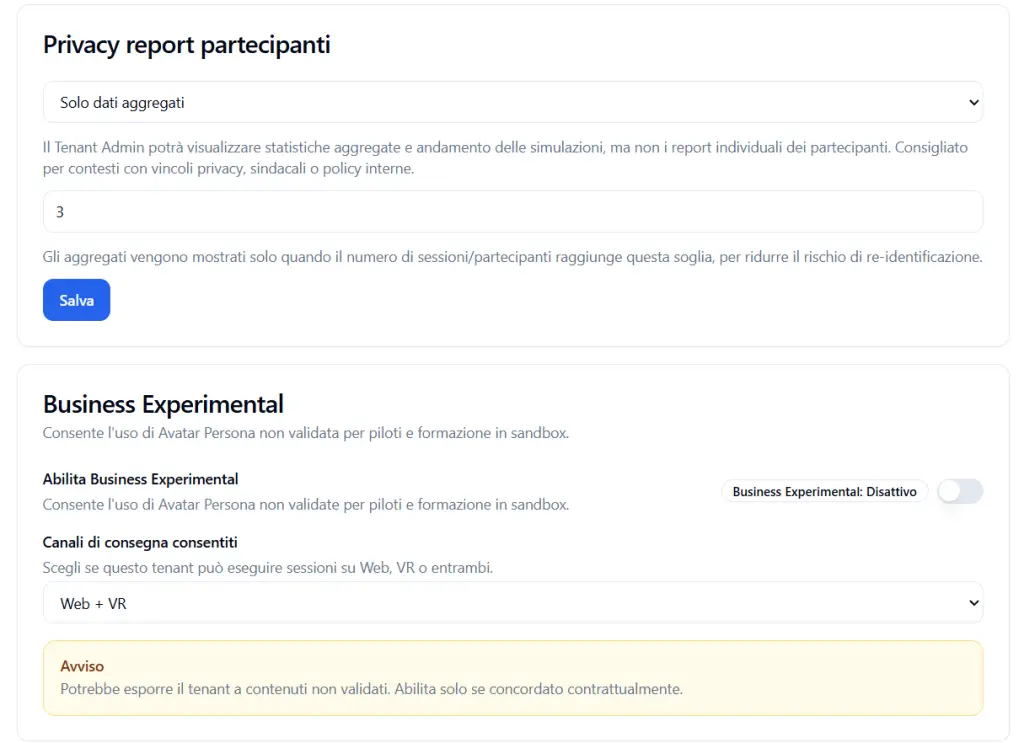
The Business Experimental section allows enabling experimental features for the tenant.
Specifically, it allows the use of non-validated Avatar Personas for pilots, tests, or sandbox training.
Enable Business Experimental #
When this option is active, the tenant can use non-validated Avatar Personas.
This feature must be used carefully, as it may expose the tenant to content not yet validated.
The platform displays a warning such as:
May expose the tenant to non-validated content. Enable only if contractually agreed.
When to use Business Experimental #
Business Experimental is useful for:
- internal testing;
- controlled pilots;
- experiments;
- sandbox training;
- evaluation of new Avatar Personas not yet validated.
It is not recommended for production pathways with end Players, unless specific agreements exist.
Allowed delivery channels #
The Allowed delivery channels section allows selection of which channels the tenant can run sessions on.
Options may include:
- Web
- VR
- Web + VR
This setting controls whether the tenant can create runtimes accessible from browsers, virtual reality, or both channels.
Simultaneous connection slots #
By default, tenants use the Provider’s shared slots to start simulation sessions.
This means that if a tenant does not have reserved slots, it will use the Provider’s available shared capacity.
Shared slots are used by all tenants, unless specific limits apply.
If all shared slots are occupied, the Player must wait for a spot to become available.
Reserved slots #
If the Provider wants to guarantee dedicated capacity to a specific tenant, they must configure reserved slots.
Reserved slots are not set on the Tenant page, but on the Capacity page.
To configure reserved slots or limits on shared slots, consult the Provider Capacity section guide.
Difference between tenant resources and simultaneous slots #
It is important to distinguish tenant resources from simultaneous slots.
Minutes #
This is the monthly time available for simulation usage.
Users #
These are the people who can be created in the tenant.
Assigned runtimes #
These are the simulation accesses the tenant can activate.
Simultaneous slots #
They are the sessions that can be carried out at the same time.
A tenant can have many active runtimes, but the ability to allow multiple Players to enter simultaneously depends on the simultaneous slots available in the Provider.
Each tenant consumes Provider resources #
Each tenant created within the Provider uses a portion of the Provider’s overall resources.
When the Provider assigns resources to a tenant, these are subtracted from the total still assignable.
Example:
If the Provider has 63,000 minutes still assignable and assigns 6,000 minutes to a new tenant, those 6,000 minutes are reserved for that tenant and reduce the Provider’s remaining availability.
The same logic applies to:
- users;
- runtimes;
- maximum tenants;
- monthly minutes;
- any limits with overage.
Practical example #
The Provider creates a new tenant called:
Demo Company
During creation, they configure:
- assigned users: 50
- assigned monthly minutes: 6000
- assigned runtimes: 10
- allow overage: active
- maximum monthly limit with overage: 7000
- report privacy: aggregated data only
- aggregate threshold: 3
- allowed channels: Web + VR
- Business Experimental: disabled
Result:
- the tenant can create up to 50 users;
- it can consume 6000 monthly minutes, with possible overage up to 7000;
- it can activate up to 10 runtimes;
- the Tenant Admin sees only aggregated data in reports;
- aggregates appear only above the configured threshold;
- the tenant can use Web and VR runtimes;
- the tenant uses the Provider’s shared slots, unless otherwise configured on the Capacity page.
Best practices #
To properly manage tenants, it is recommended to:
- check resources still assignable before creating a new tenant;
- assign minutes, users, and runtimes based on actual expected usage;
- use overage only when controlled flexibility is needed;
- set a privacy threshold appropriate to the expected number of Players;
- use Aggregated data only when privacy constraints or internal policies exist;
- enable Business Experimental only for agreed tests or pilots;
- configure Web, VR, or Web + VR based on channels actually purchased and supported;
- remember that shared simultaneous slots are managed on the Capacity page;
- use reserved slots only when a tenant needs guaranteed capacity;
- periodically verify active runtimes, consumed minutes, and remaining resources.
Final result #
The Tenant section allows the Provider to create and govern organizational environments linked to their account.
Each tenant receives resources from the Provider and can have specific configurations for users, minutes, runtimes, report privacy, Web/VR channels, White Label, and Business Experimental.
By default, tenants’ simultaneous sessions use the Provider’s shared slots.
If dedicated capacity needs to be guaranteed to a tenant, the Provider can configure reserved slots in the Capacity section.
This structure allows the Provider to manage multiple customers, departments, divisions, or business units in an orderly manner within the same ecosystem.


