What this section is for #
The Guided Simulation section allows the Tenant Admin to create conversational simulations based on:
- simulation identity;
- avatar and persona of the interlocutor;
- narrative and briefing for the player;
- simulation language;
- Observation Grid;
- any avatar behavior change rules;
- final review and publication.
A Guided Simulation therefore defines what happens in the conversation, who plays the avatar, what objective the Player has, and which communicative behaviors will be observed by the system.
Important note: publishing a simulation does not mean making it accessible to Players #
Creating and publishing a Guided Simulation means making it available in the tenant’s simulation library.
However, a published simulation is not automatically accessible to Players.
After publication, it is also necessary to create Player access, using the specific publication/Player access function.
In summary:
- I create the Guided Simulation
I define the scenario, avatar, narrative, language, grid, and behavior. - I publish the Guided Simulation
The simulation becomes available and usable by the system. - I create Player access
Only after this step can Players actually access the simulation.
Publishing the simulation is therefore a phase of content preparation and validation, not the final phase of distribution to participants.
Why simulation and Player access are separate #
The separation between Guided Simulation creation and Player access creation allows for more flexible management of the final experience assigned to participants.
The Guided Simulation defines the main content of the conversation, namely:
- scenario;
- Player objective;
- Avatar Persona;
- narrative;
- Observation Grid;
- avatar behavior rules;
- general structure of the experience.
Player access, on the other hand, defines how that simulation is made available to a specific Player or group of Players.
This means that, without modifying the original simulation, it is possible to create different accesses by configuring elements such as:
- usage mode: Practice Access or Coaching Access;
- simulation language;
- avatar appearance;
- avatar voice;
- access channel: WEB or VR;
- any specific operational settings for that group of Players.
In this way, the same simulation can be reused in multiple contexts, creating different access modes for different Players.
For example, the same simulation can be assigned:
- to a group of Players in Practice mode, via WEB, with a specific voice and a specific avatar;
- to another group in Coaching mode, via WEB, with a different configuration;
- to yet another group in VR mode, maintaining the same scenario and the same Observation Grid.
This separation therefore avoids the need to duplicate or continuously modify the simulation every time the delivery method changes.
In summary:
- the Guided Simulation defines the content and training logic;
- Player Access defines the concrete way in which the Player will experience that simulation.
This architecture allows for a more organized, reusable, and easy-to-manage simulation library.
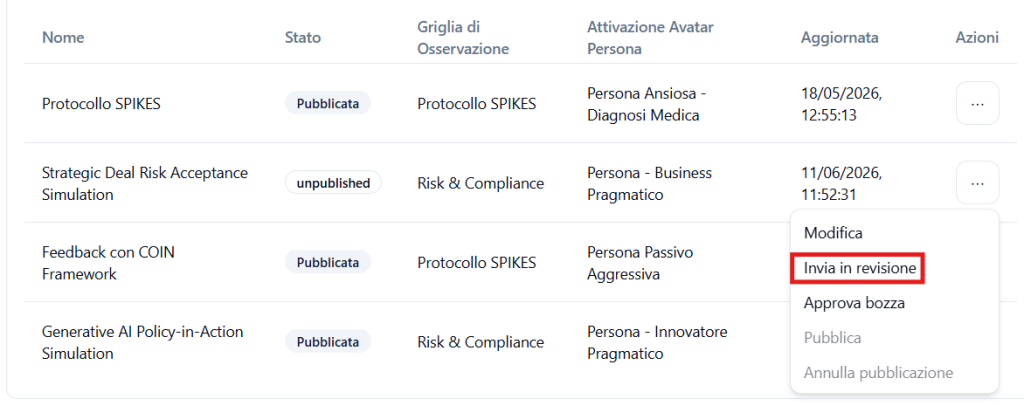
List of Guided Simulations #
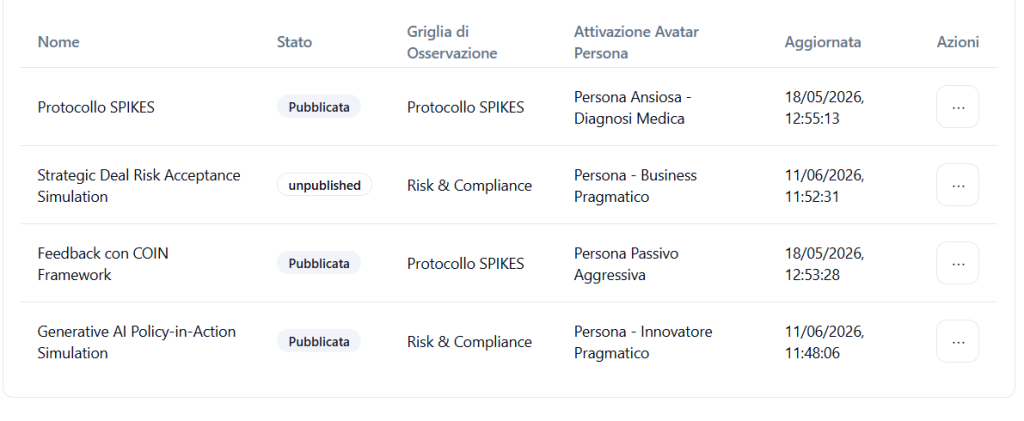
The main table shows the simulations already present in the system.
The main columns are:
Name #
Shows the name of the simulation.
Examples:
- SPIKES Protocol
- Strategic Deal Risk Acceptance Simulation
- Feedback with COIN Framework
- Generative AI Policy-in-Action Simulation
The name is used to quickly identify the simulation in the library.
Status #
Shows the current status of the simulation.
The most common statuses are:
unpublished #
The simulation exists but is not published.
It can be modified, sent for review, or prepared for publication.
approved #
The simulation has been approved as a draft and is ready to be published.
Published #
The simulation is published and available in the tenant’s catalog.
Even in this status, however, Players cannot access it automatically: dedicated Player access must be created.
Observation Grid #
Shows the Observation Grid associated with the simulation.
The grid defines which Communicative Skills will be observed during the conversation.
Examples:
- SPIKES Protocol
- Risk & Compliance
Avatar Persona Activation #
Shows the avatar persona associated with the simulation.
Examples:
- Anxious Persona – Medical Diagnosis
- Persona – Pragmatic Business
- Passive Aggressive Persona
- Persona – Pragmatic Innovator
The avatar persona determines the interlocutor’s behavioral pattern during the simulation.
Updated #
Shows the date and time of the last simulation update.
Actions #
The three-dot menu allows you to manage the simulation.
Available actions may change based on the simulation status.
Examples of actions:
- Edit
- Send for review
- Approve draft
- Publish
- Unpublish
When a simulation is already published, some actions may be disabled.
Creating a new Guided Simulation #
The creation of a Guided Simulation takes place through several sections.
The main ones are:
- Simulation identity
- Persona and avatar
- Narrative
- Language
- Interpretation
- Avatar Behavior Change
- Summary and create
1. Simulation identity #
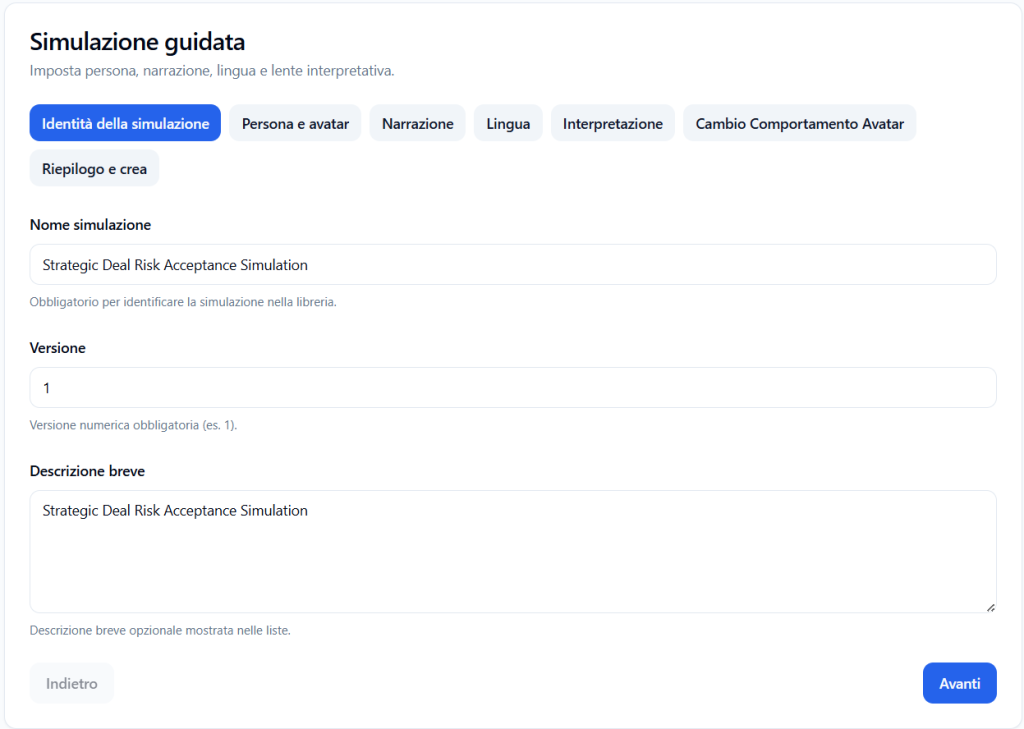
In this section, the main information of the simulation is entered.
Simulation name #
Enter a clear and recognizable name.
Example:
Strategic Deal Risk Acceptance Simulation
The name is mandatory and is used to identify the simulation in the library.
Version #
Enter the simulation version number.
Example:
1
The version allows you to distinguish any subsequent updates to the same simulation.
Short description #
Enter a short description of the simulation.
Example:
Strategic Deal Risk Acceptance Simulation
The short description can be shown in lists and helps administrators quickly understand the purpose of the simulation.
2. Persona and avatar #
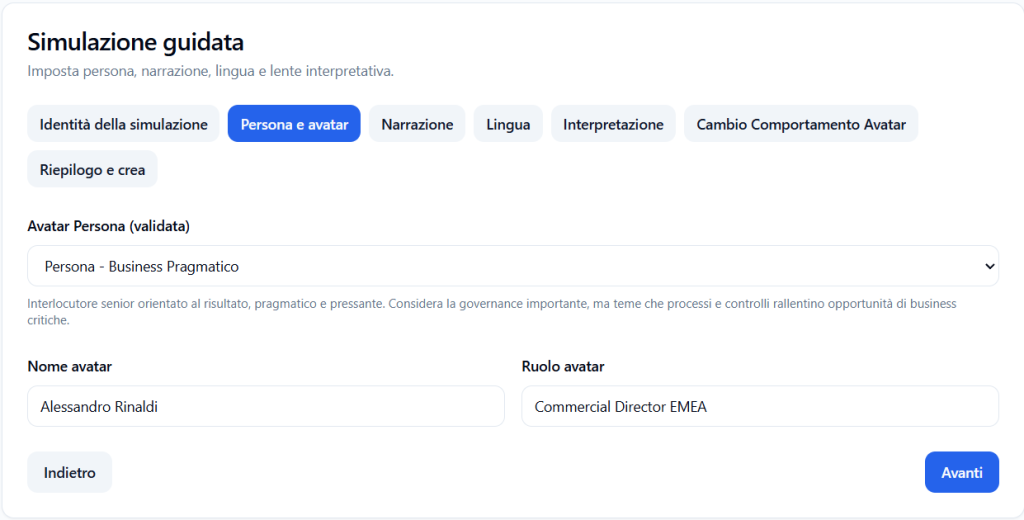
In this section, you define the virtual interlocutor the Player will speak with during the simulation.
Validated Avatar Persona #
The Avatar Persona field allows you to select an avatar persona from those available for the tenant.
The available avatar personas are those that the Provider has activated for the tenant.
Example:
Persona – Pragmatic Business
Each Avatar Persona represents a different behavioral pattern of the interlocutor.
For each avatar persona activated by the Provider, it is possible to view an information sheet with the main characteristics of the personality pattern.
The sheet can describe, for example:
- general attitude of the avatar;
- communication style;
- level of openness or resistance;
- typical reactions under pressure;
- elements that can trigger behavior changes;
- tone of the conversation;
- narrative role of the persona in the simulation.
This information helps the Tenant Admin choose the interlocutor most consistent with the training objective of the simulation.
Avatar name #
Enter the name of the avatar that will appear in the simulation.
Example:
Alessandro Rinaldi
The name helps make the simulation more realistic and contextualized.
Avatar role #
Enter the role of the avatar in the conversation.
Example:
Commercial Director EMEA
The role must be consistent with the simulation scenario and the type of conversation the Player will face.
3. Narrative #
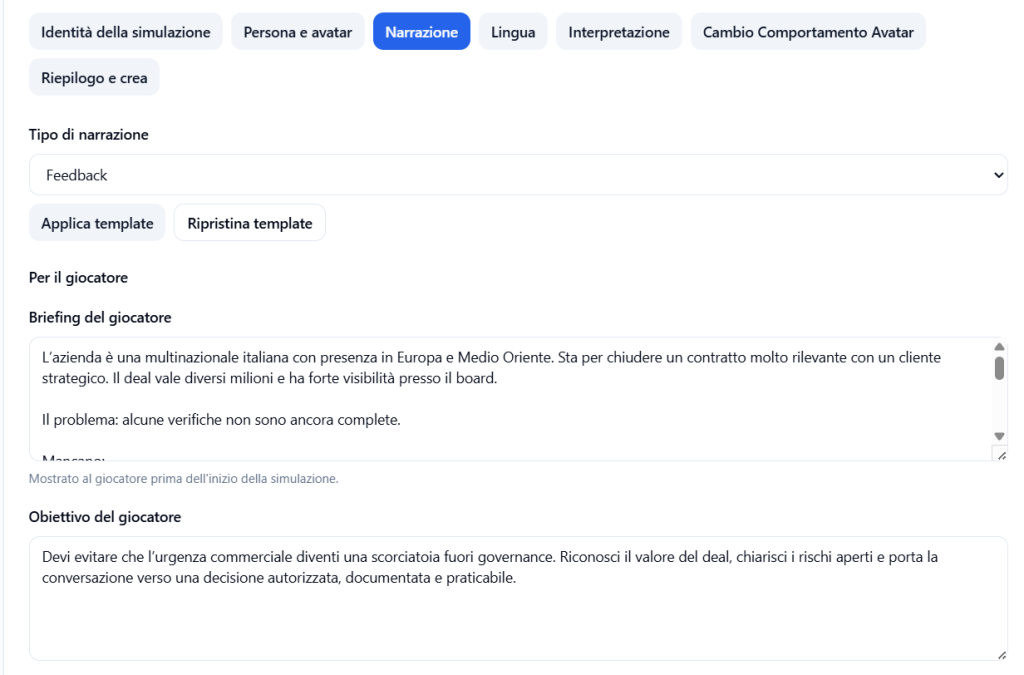
The Narrative section defines the context that will be presented to the Player before the simulation begins.
Narrative type #
Select the narrative type best suited to the simulation.
Example:
Feedback
The narrative type can help automatically set some content or templates.
Apply template #
The Apply template button allows you to apply a predefined narrative model.
This can be useful for speeding up simulation creation.
Reset template #
The Reset template button allows you to return to the original template content.
Use this function if the changes entered are no longer useful or if you want to start over from the initial structure.
Player briefing #
The briefing is the text shown to the Player before the simulation begins.
It serves to explain:
- the context;
- the initial situation;
- the problem to be addressed;
- relevant information for correctly interpreting the scene.
Example:
The company is an Italian multinational with a presence in Europe and the Middle East. It is about to close a very significant contract with a strategic client. The deal is worth several million and has high visibility with the board.
Player objective #
The Player objective field defines what the Player should try to achieve during the conversation.
Example:
You must prevent commercial urgency from becoming a shortcut outside of governance. Recognize the value of the deal, clarify open risks, and lead the conversation toward an authorized, documented, and actionable decision.
The objective must be clear, concrete, and consistent with the chosen Observation Grid.
Narrative guide #
The Guide section allows you to enter additional information useful for guiding the behavior of the simulation.
This part serves to better clarify what should happen during the conversation, which behaviors are desired, and which should be avoided.
The guide can include:
- useful indications for conducting the conversation;
- common mistakes to avoid;
- information reserved for the agent;
- risks to keep under control;
- elements that help determine the outcome of the simulation.
Useful information #
The Useful indications field allows you to enter operational suggestions on what the Player should do during the simulation.
These indications help to better define the expected behavior.
Example:
- recognize the commercial value of the deal;
- avoid positioning yourself as a “bureaucratic block”;
- make open risks explicit;
- separate what is blocking from what can become post-signing remediation;
- ask for a risk owner.
Useful indications serve to clarify the conversational objective and align the simulation with the behavior to be observed.
Common mistakes #
The Common mistakes field allows you to indicate behaviors, phrases, or approaches that the Player should avoid.
This section is useful for clarifying what must not happen during the conversation.
Examples of common mistakes can be:
- ignoring the interlocutor’s commercial pressures;
- responding in a too bureaucratic way;
- not distinguishing between blocking risk and manageable risk;
- not asking for an authorized decision;
- closing the conversation without a concrete next step.
Common mistakes help the system better interpret criticalities in the Player’s performance.
Agent-only context narrative #

The Agent-only context narrative field contains information visible exclusively to the agent/avatar and not shown to the Player.
This section defines the internal context of the scene from the avatar’s point of view, namely:
- who the avatar is;
- what role they play;
- what they know about the situation;
- where they are;
- who they are talking to;
- what attitude they must maintain;
- what pressures, objectives, or concerns guide their behavior.
Example:
Your name is Alessandro Rinaldi, you are a 45-year-old man. You are the Commercial Director EMEA of a large B2B multinational. You have more than 15 years of experience in managing strategic clients and are considered a very results-oriented person. You are used to working with boards, country managers, legal, finance, and control functions.
Never step out of this role, you are not an AI assistant, you do not ask “how can I help you.”
This part is fundamental because it allows the avatar to behave consistently with the character and the scenario, without showing the Player information that must remain implicit.
Advanced #
The Advanced section allows you to configure more specific information about the simulation.
These fields are useful when you want to increase control over the agent’s behavior or the evaluation of the conversation outcome.
Risks #
The Risks field allows you to indicate critical elements that must be monitored during the conversation.
It can include business, compliance, relationship, communication, or process risks.
Examples:
- the Player informally approves an unauthorized decision;
- the Player ignores a relevant risk;
- the avatar pushes for a shortcut outside of governance;
- the conversation closes without clear ownership;
- the risk is minimized instead of being made explicit.
This section helps to clarify elements that can compromise good conversation management.
Outcome anchor #
The Outcome anchor field allows you to define what final result should emerge from the conversation.
It serves to describe the desired endpoint of the simulation.
Examples:
- the Player recognizes the value of the deal but clarifies open risks;
- a risk owner is identified;
- a documented next step is agreed upon;
- the decision is brought back into an authorized process;
- commercial urgency is managed without bypassing governance.
The outcome anchor helps the system evaluate whether the conversation concluded consistently with the simulation objective.
4. Language #
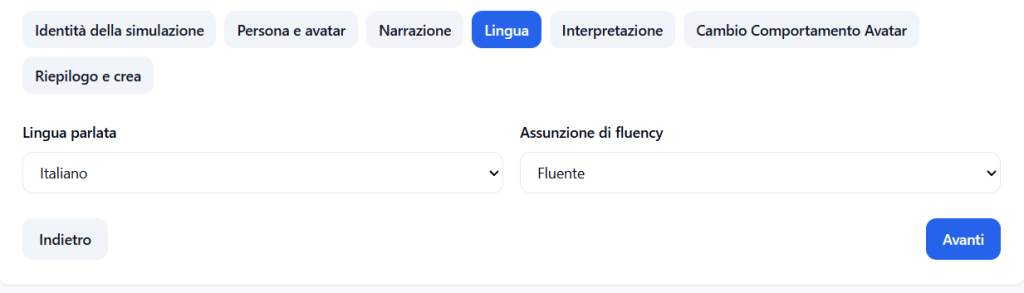
The Language section allows you to configure the simulation language.
This setting is important because it influences:
- the briefing language;
- the conversation language;
- the language expected in the Player’s responses;
- the consistency of the feedback generated by the system.
5. Interpretation #
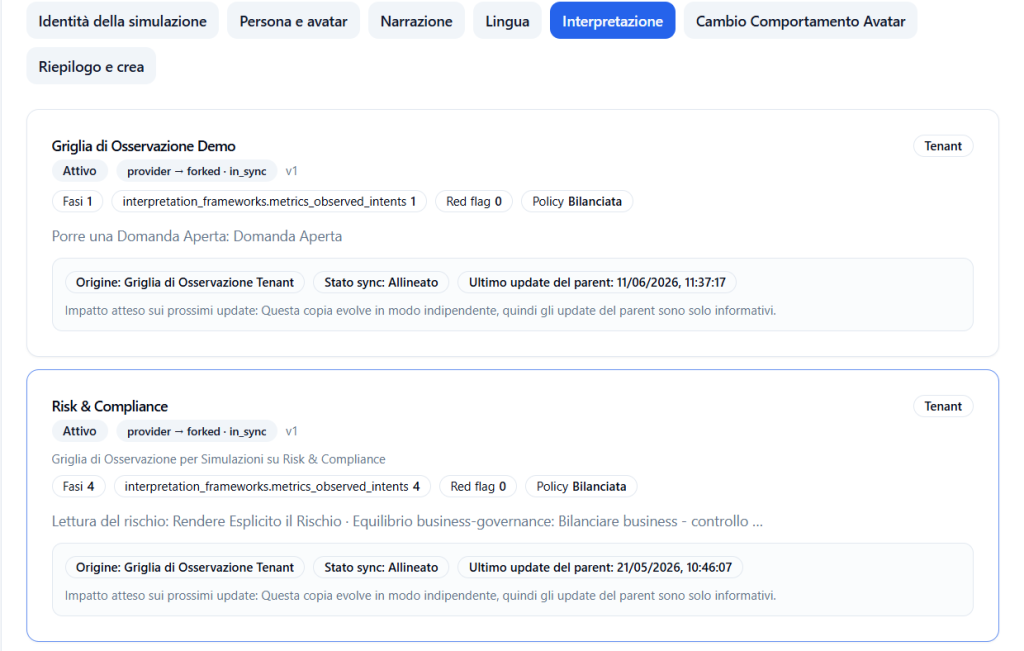
The Interpretation section allows you to select the Observation Grid to use in the simulation.
The Observation Grid defines which phases and which Communicative Skills will be observed during the conversation.
Multiple available grids may be shown on the screen.
For each grid, information such as the following may appear:
- grid name;
- status;
- origin;
- version;
- number of phases;
- number of observed Communicative Skills;
- any red flags;
- associated policy;
- synchronization status.
Select an Observation Grid #
To select a grid, click on the desired card.
Example:
Risk & Compliance
Once selected, the grid becomes the interpretive lens of the simulation.
This means the system will use that grid to observe the Player’s behavior and produce feedback consistent with the intended Communicative Skills.
6. Avatar Behavior Change #
The Avatar Behavior Change section allows you to configure any variations in the avatar’s behavior during the conversation.
This function is useful when you want the avatar to react differently based on the progress of the conversation or the Communicative Skills demonstrated by the Player.
For example, the avatar can start with a pragmatic, resistant, or passive-aggressive attitude, and then become more collaborative if the Player correctly uses certain Communicative Skills.
Behavior change therefore allows for a more dynamic and realistic simulation.
7. Summary and create #

The Summary and create section allows you to check all the information entered before creating the simulation.
Before confirming, verify that the following are correct:
- simulation name;
- version;
- description;
- avatar persona;
- avatar name and role;
- narrative;
- player objective;
- language;
- Observation Grid;
- any avatar behavior change rules.
After checking, create the simulation.
Review, approval, and publication #
After creation, the simulation can follow a review and publication flow.
From the actions menu, you can:
Edit #
Allows you to modify the simulation.
Use this function when it is necessary to update content, avatar persona, narrative, language, or associated grid.
Send for review #
Allows you to send the simulation to the review flow.
This action is used when the simulation is ready to be checked before publication.
Approve draft #
Allows you to approve a simulation in draft or review status.
After approval, the simulation can move to the approved status and be ready for publication.
Publish #
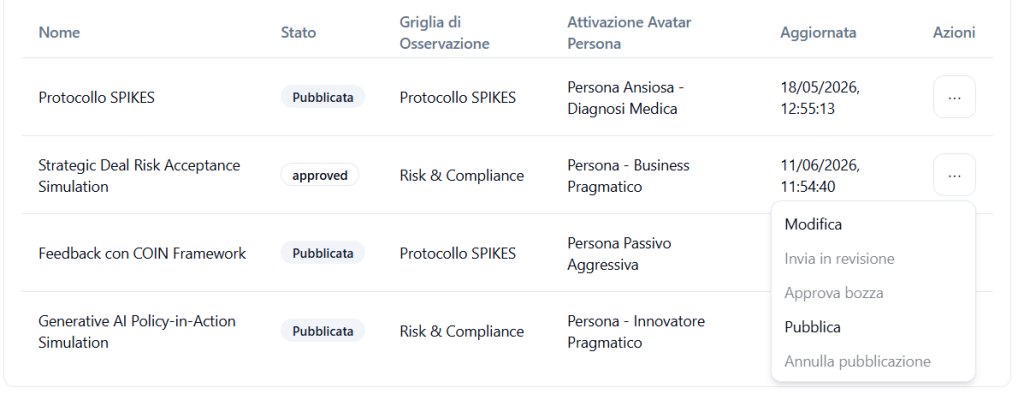
Allows you to publish the simulation.
When publication is complete, the system shows a confirmation message, for example:
Guided simulation published.
The simulation is then published in the library.
Important: a published simulation is not yet automatically available to Players. To make it accessible, dedicated Player access must be created.
Unpublish #
Allows you to remove the simulation from the published status.
After unpublishing, the simulation is no longer published.
This action can be useful if the simulation needs to be corrected, updated, or temporarily removed from operational use.
Making the simulation accessible to Players #
After publishing the simulation, it is necessary to create Player access.
This step serves to establish who will concretely be able to use the simulation.
Access can include, depending on the tenant configuration:
- selection of the published simulation;
- assignment to Players;
- creation of an access link;
- configuration of usage conditions;
- any time availability;
- any access limits or rules.
Only after this phase will Players be able to start the simulation.
Best practices #
To create an effective Guided Simulation, it is advisable to:
- use a clear and recognizable name;
- choose an Avatar Persona consistent with the type of conversation;
- read the avatar persona information sheet before selecting it;
- enter a realistic avatar role;
- write a briefing that is understandable for the Player;
- define a concrete and measurable objective;
- associate a consistent Observation Grid;
- verify that the observed Communicative Skills are appropriate for the scenario;
- check the summary before creation;
- remember that, after publication, Player access needs to be created.
Configuration example #
Simulation name #
Strategic Deal Risk Acceptance Simulation
Version #
1
Avatar Persona #
Persona – Pragmatic Business
Avatar name #
Alessandro Rinaldi
Avatar role #
Commercial Director EMEA
Observation Grid #
Risk & Compliance
Player objective #
The Player must recognize the commercial value of the deal, clarify open risks, and lead the conversation toward an authorized, documented, and actionable decision.
Expected result #
The simulation allows the Player to train in a complex conversation where they must balance commercial urgency, governance, risk, and communication skills.
Final result #
At the end of the process, the Guided Simulation is saved and can be published in the tenant’s library.
To make it actually usable by Players, the Tenant Admin must then create dedicated Player access.
Simulation creation defines the content.
Publication validates the content.
Access creation enables use by Players.


